Hello Friends!
So I was looking through my nail polish collection recently, and I realized that there are a bunch of polishes I haven't used in ages! I decided it was time to break out some old favorites and perhaps put them to new use. This was the result!
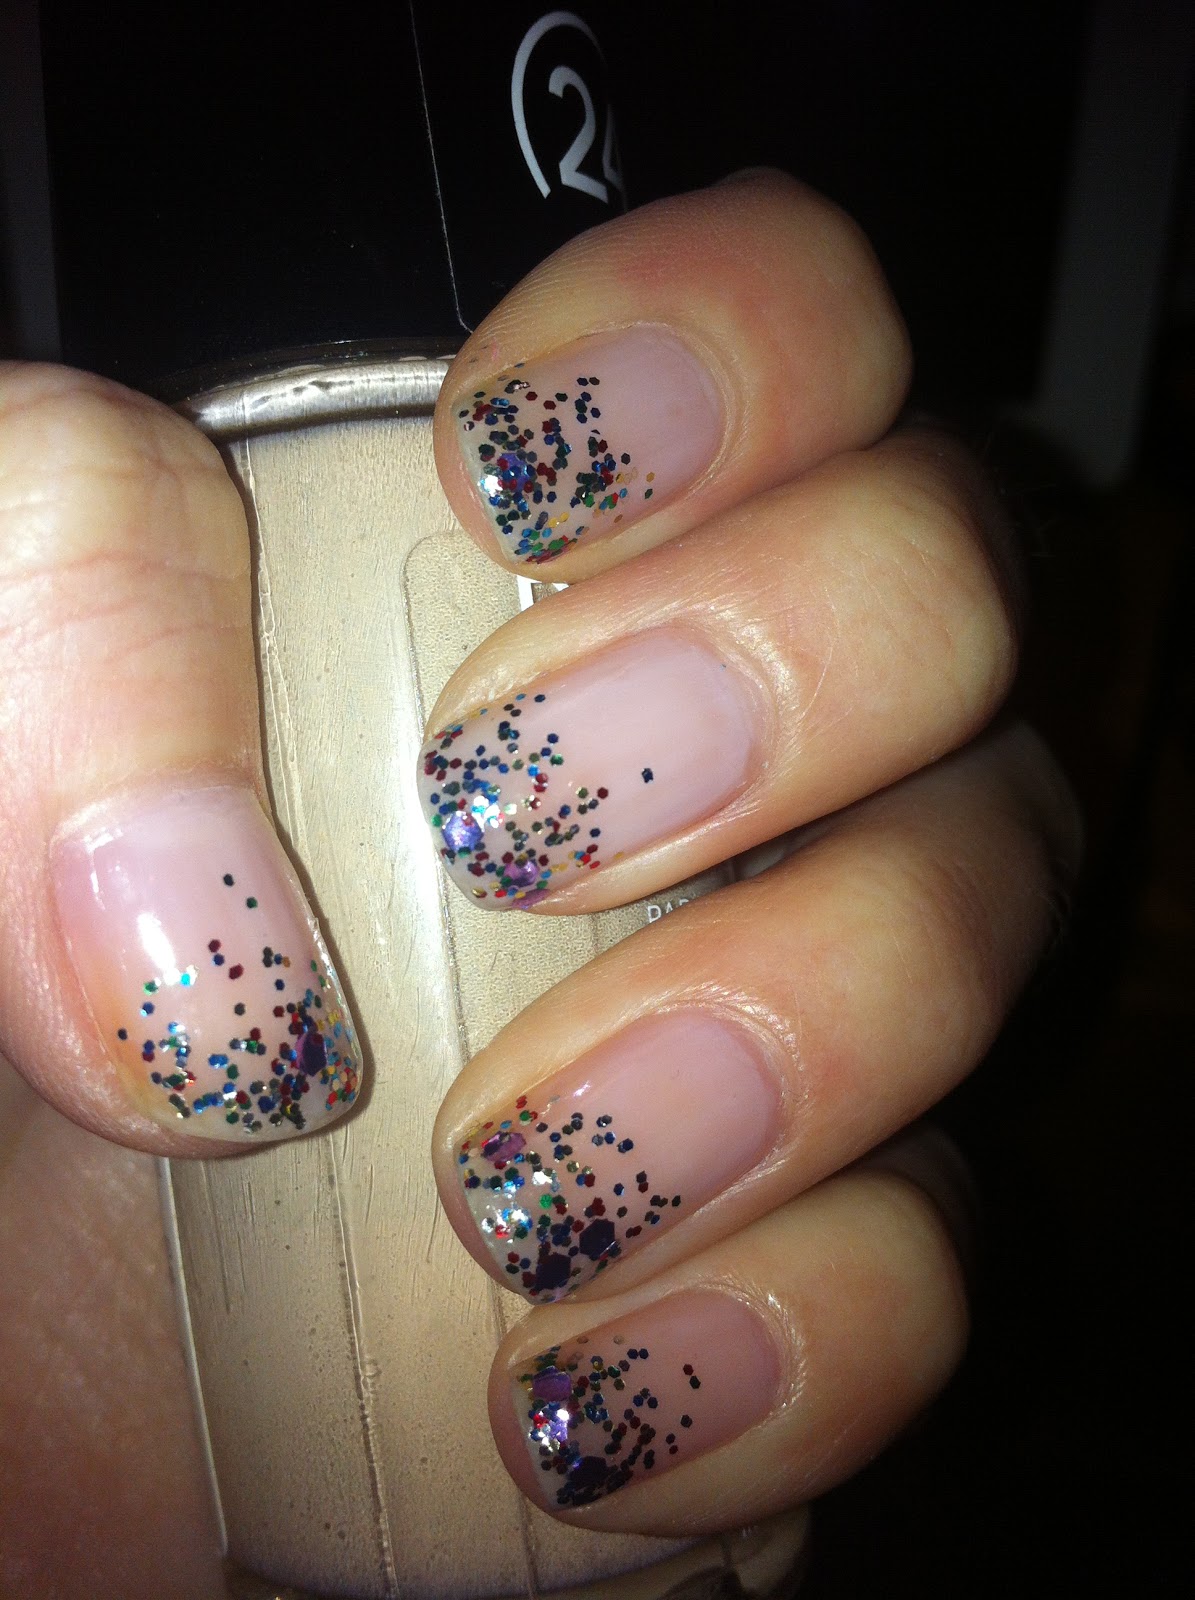
So as you can see I alternated shades of blue. The lighter blue is Essie Bikini So Teeny, and the darker blue is Essie Butler Please. I haven't used either of these in quite a while, which was obvious when I pulled the brushes out of the bottles. However, on the second coat of each polish they evened out. I did a sponge gradient on the ring finger using both colors. Not the cleanest gradient I've ever done, but it looks ok. On the rest of my fingers I did a glitter gradient using OPI Last Friday Night. I don't know why it's been so long since I used this one; it's freaking gorgeous! I think I probably could have used another layer of the glitter, but the light tip coverage looks nice too :) The other change I would make if I do this again would be to add a layer of the glitter on top of the gradient. As I played around with this glitter later on, I found that this glitter is rather thin on its own, so it would have worked nicely. However, if you do want full coverage with this glitter, you can sponge it on and it packs a punch!
I hope y'all enjoyed seeing my experimentation with old polishes! Let me know if you try something like this or what polishes you have in your collection that could use some love :) Hope y'all have a fantastic week!
~Mary Elizabeth
You are altogether beautiful my love; there is no flaw in you Song of Solomon 4:7
Showing posts with label gradient. Show all posts
Tuesday, August 14, 2018
Friday, July 27, 2018
Hometown Gradient
Hey Everybody!
I hope y'all have had a great last couple of weeks! This past weekend I went home to Orlando for a family reunion. I hadn't been home since December so it was fun to get to see my family again and be in familiar territory. One of my favorite (mundane) parts about going home is that I get to sort through my mom's nail polishes and paint my nails with some polishes that are not common among our collections. One thing I noticed is that my mom has a lot of shades in the pink/purple range, and in general a lot of polishes in the warm zone. I decided that while I had a different stash to play with and more time in which to do so, I would try to play with gradients. I did 2 different gradients in my time at home, but I am only going to share one with you. That is because the first one was almost indiscernible because the 2 colors I chose were far too close together. You really couldn't even tell I did a gradient at all. The second one, however, turned out quite nice! Here is my far more successful gradient.
So for this gradient I chose 2 different OPI purples. The lighter one is OPI Lucky Lucky Lavender, and the darker one is OPI Hello Hawaii Ya? My mom has a whole lot of OPI polishes, and she likes the first shade I mentioned so much that she bought 2 of them. Anyway, I painted all my nails with the lighter shade, then on the ring finger did a gradient of the 2 shades with a cosmetic sponge. There are a crap ton of tutorials on how to do this on YouTube, so I'm not going to explain how to do this. I am not super great at gradients because I don't do them all that often, but I was pleasantly surprised at how successful this was. I think I need to look for some slightly less porous sponges in the future, because up close you can see some little speckles from the sponge in the gradient. Anyway I finished it off with Seche Vite top coat, which I am slowly falling back into love with.
So that is my gradient using my mom's polishes! I really need to do these more often because this one came out so nice. Hope y'all have a fantastic weekend!
~ Mary Elizabeth
Wednesday, September 4, 2013
September Nail Art Day 2: Gold and Teal
Hey everybody!
Today I am posting the first of my September nail art designs! Today's theme is gold and teal. These colors represent childhood and ovarian cancer awareness, for which September is the month. Not gonna lie, this ended up reminding me of perry the platypus. Here's what I came up with!
I started with a base color of OPI Fly. This is a little darker teal than I was hoping for, but it works. Then I used OPI Goldeneye as a gradient. I'm really excited that this worked! I was a little bit skeptical as to whether this would work or not, so I'm glad to have discovered a new technique.
I hope y'all enjoyed, and be sure to stop back on Saturday for school colors day! Have a fabulous rest of your week!
~ Mary Elizabeth
Saturday, June 1, 2013
Blue Skies and Sunshine
Hey guys!
Today's post is a really fun yet classy summer mani that I think looks like the gorgeous blue skies outside my window! It is a reverse glitter fade that glistens beautifully in the summer sunlight. Hope y'all enjoy!
For the base color I used Essie Bikini So Teeny. I did a review on this color and one other from that collection about this time last year, so feel free to go check it out here. I love this blue because it is not as intense as some of the other blues I own. The glitter is my standard glitter fade go to, OPI Glitter-ally the Best Silver Ever. This makes a great combo that looks very classy. It is so simple and so perfect for summer, a day at the beach, or any other day :) Hope y'all enjoyed, and have a fabulous weekend!
~ Mary Elizabeth
Tuesday, February 12, 2013
Confetti Fade
Hello Lovelies!
So today I have a look for you that I did using some of the polishes I got from holiday collections. I hope y'all enjoy!
So I started with a base of OPI Tomorrow Never Dies from the James Bond collection. The blue/purple is the kind of color that I reach for a lot. It's a color that I can wear without being too crazy. The glitter I used is Zoya Electra. This is a very nice bar glitter. I like this because it is finer glitter than OPI Save Me which I don't own, but I have looked at it and decided I didn't need it. The problem I have with bar glitter on the tip of my nails is that it tends to catch on things and scratch me. However, it makes a very unique glitter gradient that is subtle yet fun. I hope y'all enjoyed, and have a terrific Tuesday!
~ Mary Elizabeth
Monday, January 7, 2013
Christmas Nails
Hello There!
So today I decided to share with you the two nail designs I did for Christmas! I love just about any holiday that has theme colors because I can do things like this. I hope this gets you back into the Christmas spirit :)
This nail design is the more complicated of the two. For the base color I used Essie Clutch Me if you Can Zoya Frida on the ring finger. I like Clutch Me if you Can rather than a stark red because it looks better on my skin tone. Reds usually tend to wash me out, so I tend to go for a darker, more burgundy shade. For the tips I used OPI Goldeneye from the James Bond collection. This one is a little thin and flaky, so it took two coats to get the tips solid. For the stripes I used my Kiss nail art polish in gold. I topped it off with Sally Hansen Insta-dri top coat.
For this look I started with a base of OPI Care to Danse. I always use sheer polishes like this one for french manicures. I used Sally Hansen Diamond Strength in Honeymoon Red for the tips. This is the exception to my no red rule. For the glitter fade I used OPI Getting Miss Piggy With It. This made a great glitter fade, oddly enough. I thought the red would look weird on my nails, but it actually looked fantastic. So there's my holiday nail fun! I hope you enjoyed it, and have a wonderful week!
~ Mary Elizabeth
Labels:
essie,
freehand,
french manicure,
glitter,
gradient,
holiday,
nails,
OPI,
sally hansen,
stripes,
zoya
Sunday, October 21, 2012
Glitter Gradient Madness! + Update
Hey Everybody!
I'm back! I know that I haven't posted in a long time, but life has been crazy. I began college in August, so I have been really busy lately. It has really been an adjustment moving and becoming more independent, but I know that if I trust in God and work hard I will be able to succeed.
Now, on to the nails! I have been obsessed with glitter gradients lately. It is a really quick, easy way to get impressive looking nails. Here are some of my favorite gradients so far!
For this I started with Julie G polish in Gelato in Venice. I got this polish at Rite Aid, and I'm really impressed with the pigmentation. For the glitter I used OPI Glitter-ally the Best Silver Ever. I like the fact that this glitter is big enough to make a good fade but not so big that it only leaves a few pieces of glitter on the nail.
For this one I used OPI Barre my Soul as a base. This is a great sheer polish. I love it for french manicures. Again, I used Glitter-ally for the glitter. For this one I tried to get more of a french mani look that kind of fizzles at the top.
This one began with OPI Care To Danse? This is another very sheer polish. If you can't tell, I really like the whole glitter on sheer thing ☺. The glitter is a Francesca's polish in Confetti. This glitter is a little tough to work with, but once you figure it out you get a super cool effect.
So I hope y'all enjoyed this post, and I hope you give the glitter gradient a try. I will try really hard to get more posts up soon, but I can't make any guarantees just because of my work load. The lament of a music student! I appreciate all of you for sticking with me! I hope you have a marvelous Monday!
~ Mary Elizabeth
Tuesday, May 8, 2012
My First Gradient
Hello Lovelies!
First off, I just want to apologize for being a little MIA. I have been trying to post from my phone lately, but for some reason they're just not going through. I will try to post the looks that I like the best from those attempts later this week. Anyway, today's post is about a new technique I tried: sponge gradient. I have wanted to try this for a while, but I didn't have the materials I needed. Now that I do, expect lots more of these types of posts!
I hope you can see the colors ok! First, for the base color, I used OPI Midnight in Moscow. Then I used a makeup sponge and OPI Glitzerland for the gradient. I did this by applying a little blob of polish on the tip of the sponge. Then I lightly dabbed the polish on the tip of my nails and worked my way up. Some people blot the polish before on a sheet of paper or something before putting it on their nails, but the sponges I use absorb some of the polish, so I don't feel the need to do that. I think this turned out pretty well. I like the colors I chose, even though they are not really summer colors. I hope you enjoyed this post, and I would love it if y'all would put a comment below of any designs you think I should try. Also, let me know what colors you think would look good with this technique. I hope y'all have a whimsical Wednesday!
~ Mary Elizabeth
Subscribe to:
Posts (Atom)