Sunday, November 11, 2012

Green and Gold Freehand

Hey guys!
Today's post is a look that I did a few weeks back that I thought I would share with y'all.  I wanted to try out a gold nail art pen that I got at Francesca's (the same as the black one I talked about in my last post).  I hope you like what I came up with!
First of all, let me apologize about my broken pointer finger nail.  It broke not long before I did this mani, but it's back to normal now.  Anyway, I started with a base of OPI Here Today, Argon Tomorrow.  This is a nice dark green creme.  It takes about three coats to get a solid color.  Then, as I mentioned before, I used a nail art pen in gold for the stripes and stuff.  It is pretty difficult to get a straight line because you have to squeeze the tube and draw the line at the same time.  With that said, I really like how it turned out.  I topped it off with CND Air Dry top coat.  I hope y'all enjoyed this, and I hope you will try this out yourself!  Have a marvelous Monday!
~ Mary Elizabeth

Friday, November 9, 2012

(Late) Halloween Nails!

Hey Y'all!
So I know I'm super duper late on this, but I thought I'd show y'all how I painted my nails for Halloween last week.  I had a really fun time on Halloween.  My friends and I went to dance that was hosted by a guy in the music department on my campus.  I'll add pictures at the end of this post of us in our costumes at the end of this post :) Anyway, on to the mani!
Let me start by saying sorry there's only one pic.  I was on a bit of a time crunch.  I started with a base of OPI In My Back Pocket (I think.  It's a mini polish and it doesn't have a name on it).  For the stripes I used a nail art pen that I got from Francesca's.  I'm not quite sure of the brand, but any nail art pen will do.  I used Sinful Colors Black on Black for the thicker striped areas.  Finally I topped it all off with CND Air Dry top coat.  I plan on doing a review of this soon.  I hope y'all enjoyed this post, and I hope you had a happy Halloween!
~ Mary Elizabeth
Ps here are some pics from my Halloween festivities!
These are the school of the arts professors all dressed up as Harry Potter characters!  How cool are they?!

Me and my friends!  From left to right character names: neon girl, dude in box, Kevin and Rod from Hot Rod, hipster Harry Potter, and Kim Possible (me).  Ya we're cool :)

Sunday, October 21, 2012

Glitter Gradient Madness! + Update

Hey Everybody!
I'm back!  I know that I haven't posted in a long time, but life has been crazy.  I began college in August, so I have been really busy lately.  It has really been an adjustment moving and becoming more independent, but I know that if I trust in God and work hard I will be able to succeed.
Now, on to the nails! I have been obsessed with glitter gradients lately.  It is a really quick, easy way to get impressive looking nails.  Here are some of my favorite gradients so far!
For this I started with Julie G polish in Gelato in Venice.  I got this polish at Rite Aid, and I'm really impressed with the pigmentation.  For the glitter I used OPI Glitter-ally the Best Silver Ever.  I like the fact that this glitter is big enough to make a good fade but not so big that it only leaves a few pieces of glitter on the nail.

For this one I used OPI Barre my Soul as a base.  This is a great sheer polish.  I love it for french manicures.  Again, I used Glitter-ally for the glitter.  For this one I tried to get more of a french mani look that kind of fizzles at the top. 

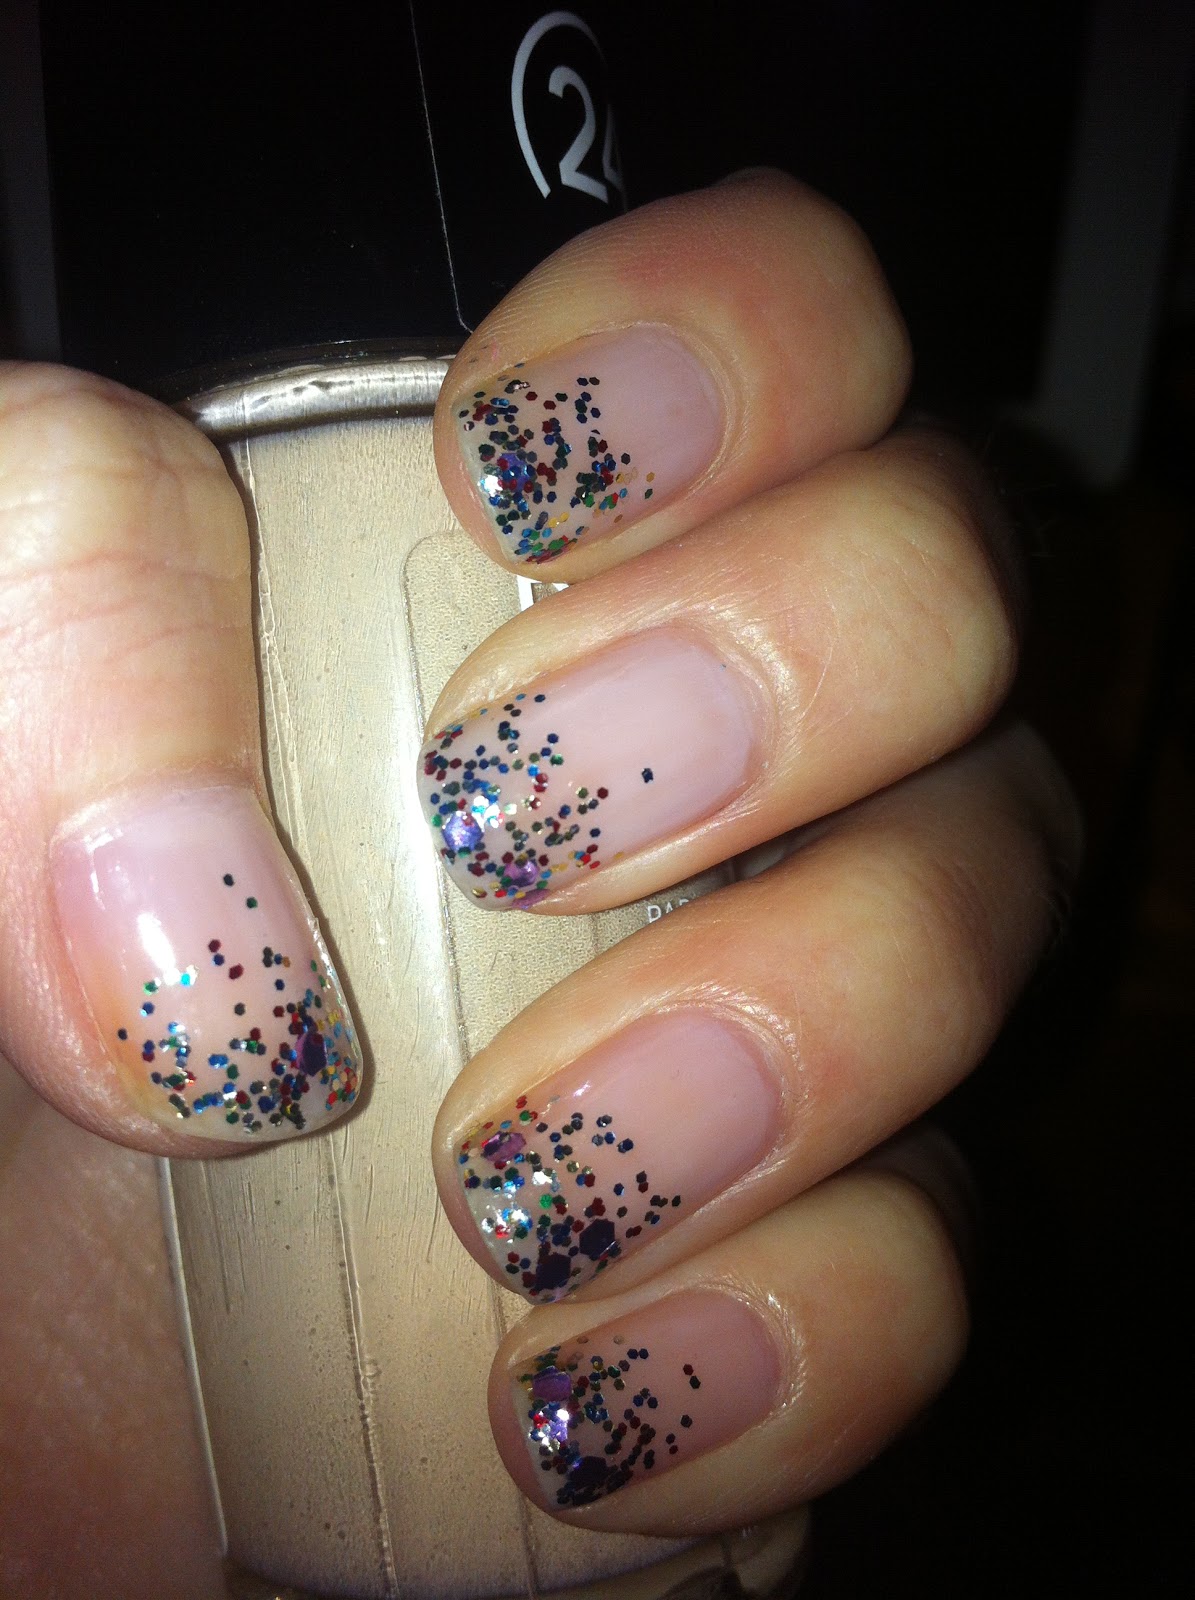
This one began with OPI Care To Danse?  This is another very sheer polish.  If you can't tell, I really like the whole glitter on sheer thing ☺.  The glitter is a Francesca's  polish in Confetti.  This glitter is a little tough to work with, but once you figure it out you get a super cool effect.

So I hope y'all enjoyed this post, and I hope you give the glitter gradient a try.  I will try really hard to get more posts up soon, but I can't make any guarantees just because of my work load.  The lament of a music student!  I appreciate all of you for sticking with me!  I hope you have a marvelous Monday!
~ Mary Elizabeth

Friday, August 10, 2012

First Try: Edgy Half-moons

Hey there!
So today I'm doing another post in my ongoing First Try series!  I wanted to do a tape mani, but I didn't want to do just any old half-moon, so I tried a version that I saw in a post by Erika from Chloe's Nails.  It's not exactly like hers, but it's similar!


I started with a base of Essie A Crewed Interest.  This is one of my favorite summer colors!  Then, after the polish dried, I taped off triangles on my nails and used Essie Shine of the Times to create the edgy half-moons.  I didn't like how the Shine of the Times didn't show up too much, so I used my Kiss gold glitter to outline the triangles.  This is also a great way to clean up any mistakes made when removing the tape.  Finally I finished it off with one coat of Seche Vite top coat.  I hope this was a fun post for you, and have a fabulous Friday!
~ Mary Elizabeth
Ps be sure to check out Chloe's Nails!

Thursday, August 9, 2012

Sunny Side Up!

Hey everybody!
So this is my last week in my hometown before I go off to college.  I have been having a lot of fun with my friends this week.  So in honor of my last week of summer, I decided to do some freehand nail art!


So I started with a base of OPI Alpine Snow.  This makes the yellow pop a little more.  Then I used one coat of OPI Need Sunglasses? Once that dried I used an OPI orange (I don't know the exact name of it because it is a mini) to paint a sun on my ring finger.  I carefully created a curved line around the corner of my nail and filled it in.  Then I used dotting tools to create the rays.  I finished it off with one coat of Seche Vite top coat.  I had a lot of fun with this design.  I don't do a ton of freehand designs, so this one was extra special :) I hope you all enjoyed this post, and have a terrific Thursday!
~ Mary Elizabeth

Wednesday, July 25, 2012

Pink Wednesday Returns!

Hey There!
I am so glad to be posting again!  I have a pink Wednesday for you today.  It's been a long time since I did a pink Wednesday, and I can't wait to show you what I did!


To begin with I used OPI Japanese Rose Garden as a base color.  Then I cut strips out of a piece of tape to get the skinny stripes.  For the darker pink I used Pretty Please polish in Pink Crush.  I will do a review of this brand in a later post.  For the silver stripes I used my Kiss art polish.  I really enjoyed this because it is simple, easy, and super cute!  I like that it looks like it takes a ton of effort, but it really just takes a little time.  I hope you enjoyed this post, and I hope your Wednesday was wonderful!
~ Mary Elizabeth

Tuesday, July 24, 2012

I'm Back! Update 7/24/12

Hey Everybody!
I am so sorry that I haven't posted in over a month!  I have been really busy this summer, which is not what I expected my summer to be like.  I got a babysitting job, so I have been babysitting ten hours a day three day a week for about two months now.  The kids I babysit require me to keep them occupied, whether it be playing video games or pretending we are Star Wars characters.  This hasn't left me a whole lot of time to post.  Also, I leave for college in less than a month.  I have been doing some major shopping for my dorm room.  I will be sure to show you pics of my dorm when I get it all set up.  I have been painting my nails, and I have several posts planned, including a pink Wednesday for tomorrow.  Again, I am so sorry for being MIA lately, and I hope to be back to blogging for good now :) I hope your summer has been wonderful, and hopefully I will have a post up tomorrow.
~ Mary Elizabeth

Friday, June 22, 2012

Shimmering Summer

Hey there!
So today's post is about a polish that I have been obsessed with lately: OPI Happy Anniversary.  I have had a hard time finding this one in the past, but the other day I was in my grocery store and found it in the beauty section.  I personally think that is an incredibly odd place to find a polish, but I'll take what I can get :)  This is a fantastic polish for layering over solid, creme polishes.  One thing I really like is that it works with all different colors.  As you will see in the pictures, there are lots of combinations to try.

 This is Happy Anniversary over China Glaze For Audrey.  I like that it lightened it a little.  This is what I had on my nails for graduation :)

 This is Happy Anniversary over OPI Alpine Snow.  By itself Alpine Snow is very messy looking, but with a little cleanup and this awesome polish, a pearly finish is the result.
Overall I absolutely love this polish!  It is a great way to transform an ordinary creme finish polish.  I have been using this one all the time, and I know it will continue to be a favorite.  I hope y'all enjoyed this post, and I hope you have a wonderful weekend!
~ Mary Elizabeth

Saturday, June 16, 2012

Essie Summer Polishes

Happy Saturday!
  I hope your summer is off to a fabulous start! Today I will be reviewing the two polishes I picked up from Essie's summer collection. I am really excited about this collection, and I hope you enjoy!

 This first one is Bikini So Teeny.  This one is my favorite of the two that I bought.  It is a light, bright periwinkle color.  I like the formula of this because it isn't a streaky as a lot of Essie polishes, especially after the second coats.  I also like that is makes my white self look a little tanner :) It definitely takes two coats to make it solid.

This one is called Mojito Madness.  This is the color that I really wanted, but I ended up liking Bikini So Teeny better.  It is a really gorgeous Kelly green color.  This color is currently in my toes.  I was hoping it would be a little brighter, but it is still a very pretty color.  It only takes one coat to get a solid color, but I used two just to be sure. 

Overall, I really like these colors!  I plan to wear them a good bit this summer.  These would be really useful for creating designs.  I hope to get some more from this collection soon; these were just the ones that really stuck out to me.  I am always attracted to greens, so Mojito Madness was kind of a given :).  I hope you enjoyed this post, and I definitely recommend you pick up this collection.  I have a few new posts planned for this week, so keep an eye out! Have a fantastic Father's Day!
~ Mary Elizabeth

Thursday, May 31, 2012

My New Obsession: Holographic!

Hello Everyone!
I hope you are having a lovely week.  I am officially done with high school, and I am so excited!  Not only does this mean that I am heading off to college soon, but it also means that I will have more time to blog over the summer!  I can't wait to get more cute nail looks out to y'all.  Anyway, today's post is about a super cool new nail polish I got at Ulta the other day.  It is a really cool holographic.  One thing I have noticed is that good holos are really hard to find, and when you do find them they are really expensive.  Layla Holographic Effects, however, is available at Ulta for $15.  I know that may sound like a lot, but compared to polishes that you have to order online, that's not bad. The color I got is called Mercury Twilight.  I also bought the little buffer thing that they tell you to buy.  It was only like $2, so i didn't mind.  Anyway, I did a little experiment to determine whether you really need that little buffer thing.

So for this little experiment I used a different technique on each finger.  On my index finger I just buffed my nail with the little buffer thing and applied the polish.  On my middle finger I used the buffer and a base coat.  On my ring finger I used nothing; no base coat or buffing.  On my pinky I used just a base coat.  And finally, on my thumb I used just the buffer, applied the polish, and used a top coat.  All fingers have two coats of polish.  I think, based on the pictures, it's pretty obvious that just using the little buffer thing and not applying a top coat worked best.  All the other methods were clumpy, streaky, and not worth trying.  If you decide to get this polish from Ulta, definitely get the buffer.

So here's what the polish looks like in the sunlight.  It is absolutely AMAZING!  I love the fact that it is a silver, but there are also lots of other colors embedded in it.  There are two downsides though.  1. Because using a topcoat will take away from the holo, it chips pretty quickly.  This was a little disappointing, but it isn't bad enough to make me not use it.  2. I kept getting really distracted by the fact that my nails kept changing color.  This isnt a huge deal, but it's something to keep in mind.  Overall I really like these, and I plan to buy other colors.  I hope y'all enjoyed this post, and have a terrific Thursday!
~ Mary Elizabeth


Sunday, May 20, 2012

First Try: Vintage Roses

Hey there!
Today I am starting a a new sort of series called first try.  This will be a series that will be kind of ongoing, and it will be posts demonstrating the first time I try a style or design.  Today's design is roses.  I saw this on a YouTube video and had to try it! Here's the link: http://www.youtube.com/watch?v=6k0MWWVuZ2s&feature=related


For the base I used OPI Steady as She Rose.  The two colors I used in the roses are OPI Alpine Snow (white) and OPI Dim Sum Plum (pink).  I used my dotting tools to create the flowers according to the video.  Obviously I didn't do everything in the video, but I love how these flowers turned out! I hope y'all liked this quick post, and I hope you have a fabulous week!
~ Mary Elizabeth

Wednesday, May 16, 2012

Update 5/16/12

Hey everybody!
I just wanted to update you guys on whats going on in my life, plus explain why I haven't posted much lately.  The past two weeks have been AP tests, and I have taken two: AP Literature and AP Music Theory.  Both were tough, but I think I did well.  Personally, I am just trying to get to graduation, which is in two weeks! This makes me nervous, but I am also very excited to be finishing high school.  Also, my birthday was May 1, and I had a wonderful time with my friends and family.  I will add some pictures at the end of my festivities.  Anyway, my family and I went to Red Lobster, which is a tradition of mine.  Then this past weekend I went to Disney with some of my best friends, which was an absolute blast!  The next week or two will be pretty crazy with a band concert tomorrow (super exciting!), a chorus concert (which I have a duet in), and finals.  After that, I will hopefully get back in the swing of doing regular blog posts.  I also plan to get a job this summer, but I think I can still get a post in at least twice a week if not more.  I hope you are having a wonderful week, and i hope to be posting some actual nail posts soon!
Here are some pics from my birthday festivities:
me and my friends Cailah and Bella about to watch the fireworks

me & Cailah

me and my friend Shane (who is kicking my horse in the face) on the carousel

Bella (top left), Cailah (bottom left), Shane (next to Bella), Erik (next to Shane), and me (hidden in the back)
God bless!
~ Mary Elizabeth

Wednesday, May 9, 2012

Pink Wednesday: Frosty French

Hey everybody!
So today is Wednesday, and you know what that means: Pink time!  Today's post is another funky french, only this time it is a little more subtle than the last one.  These types of designs are growing on me :)

I started with OPI Pedal Faster, Suzi as a base color.  Then I used OPI Japanese Rose Garden for the french tips.  For the ring fingers I just dragged the brush diagonally across my nail to change up the design a little.  Then I used my kiss silver glitter to clean up the mistakes.  Then I finished up with Seche Vite top coat.  I hoped y'all liked this post, and have a fantastic rest of your week!  Also good luck to those of you who are AP testing this week and next!
~ Mary Elizabeth

Tuesday, May 8, 2012

My First Gradient

Hello Lovelies!
First off, I just want to apologize for being a little MIA.  I have been trying to post from my phone lately, but for some reason they're just not going through.  I will try to post the looks that I like the best from those attempts later this week.  Anyway, today's post is about a new technique I tried: sponge gradient.  I have wanted to try this for a while, but I didn't have the materials I needed.  Now that I do, expect lots more of these types of posts!

I hope you can see the colors ok! First, for the base color, I used OPI Midnight in Moscow.  Then I used a makeup sponge and OPI Glitzerland for the gradient.  I did this by applying a little blob of polish on the tip of the sponge.  Then I lightly dabbed the polish on the tip of my nails and worked my way up.  Some people blot the polish before on a sheet of paper or something before putting it on their nails, but the sponges I use absorb some of the polish, so I don't feel the need to do that.  I think this turned out pretty well.  I like the colors I chose, even though they are not really summer colors.  I hope you enjoyed this post, and I would love it if y'all would put a comment below of any designs you think I should try.  Also, let me know what colors you think would look good with this technique.  I hope y'all have a whimsical Wednesday!
~ Mary Elizabeth

Saturday, April 28, 2012

Secret Garden Nails!

Happy Saturday everybody!
I know I didn't post a Pink Wednesday this week, but I wanted to wait to post this manicure!  This weekend my school's drama department is putting on The Secret Garden, and I am house managing (which means that I am in charge of the ushers and making sure the audience isn't distracting anybody).  It is a tradition that my nails match the show, so of course I had to do Secret Garden nails!

 For the base color I used OPI Uh oh, Roll Down the Window.  I really don't use this one too much, but I thought it fit for this look.  Then I used Bundle Monster plate BM19 and Sally Hansen Insta-dri Silver Sweep, which I reviewed in my last post.  It works really well for stamping! for the flower, I used OPI Cajun Shrimp for the petals and Kiss gold glitter for the middle.  I may do a tutorial on how to make these flowers.  Finally I used Seche Vite top coat.  I hope you all enjoyed this post, and have a lovely weekend!
~ Mary Elizabeth

Sunday, April 22, 2012

Review: Sally Hansen Insta-dri

Hey everyone!

I hope you all had a great week!  So today I am going to review a polish I picked up yesterday: Sally Hansen Insta-dri.  
The color I chose was Silver Sweep.  I chose this color because I ran out of my favorite silver, Sally Hansen Celeb City.  Also, I heard that these polishes are really good for stamping, so I figured silver would be a good color to start with.  Overall I really like this polish.  It went on very opaquely.  In the picture above, I only used one coat.  Ordinarily I would use two coats even if it really only needs one, but i didn't feel the need to use a second coat.  The finish is really nice and metallic.  I think I will get a lot of use out of this polish!  I got bored with the simple silver, so I added some stamping!
The plate I used Bundle Monster BM19.  It is a cool houndstooth print.  The problem I have with these plates is that the print is not always big enough to fit my whole nail.  Anyway, I thought this would look cool over the silver, and I was right! It turned out really nice!  So I hope y'all enjoyed this post.  I'm sorry I haven't been posting a whole lot; I've been crazy busy and probably will be for the rest of the school year, but this summer I hope to be able to post more often!  I hope you have a Marvelous Monday!
~ Mary Elizabeth
Edit: for those of you who read this when I first posted it, I spelled Insta-dri wrong, so I went back and corrected it :)

Wednesday, April 18, 2012

Pink Wednesday: Girly and Glamorous!

Hey there!
Sorry I've been MIA lately. I've had a ton of schoolwork lately. Anyway, today is Wednesday, which means I'm wearing pink nail polish! Before I begin, I have two disclaimers. First, this post is from my phone, so the pictures will be last. Second, please excuse my ugly, short nails. My nails have been breaking like crazy this week. Anyway, on to the post. So I began with Opi "flashbulb fuscia". This was one of my first Opi polishes ever! It definitely only takes one coat to get a good solid color. Then I used my black Kiss nail art polish to draw a stripe on the outside half of my nails. Then I took a silver Kiss art polish to draw stripes surrounding the black stripe. This helps to clean up any mess you made with the black. Then I finished with one coat of seche vite. I hope y'all enjoyed this post, and have a wonderful Wednesday!
~ Mary Elizabeth